I have to make an emergency family visit back to the UK, so I won't be in my cozy little kitchen for a little while.
I'll be back soon - please don't go away....
Saturday, January 29, 2011
Thursday, January 27, 2011
Sweet Potato Discs
Believe it or not I can't ever remember having sweet potatoes until we came to Canada. Now, I don't think a day goes by that I don't have at least one in my potato bag. It doesn't matter how they come - mashed, as fries, shredded, wedges, mixed with other veggies - no matter how, I just love them. These are flavoured very subtly with a cajun seasoning, but use your favourite seasoning. They are so simple to make and are delicious either as a side dish or even just a big plate of them on their own with some chive dotted sour cream to dip into - yummy!!

Sweet Potato Discs
serves 4 as a side dish
2-3 medium sweet potatoes
1 Tbs vegetable oil
1 tsp cajun seasoning
1 tsp garlic powder
1/2 tsp salt
1/4 tsp pepper


Sweet Potato Discs
serves 4 as a side dish
2-3 medium sweet potatoes
1 Tbs vegetable oil
1 tsp cajun seasoning
1 tsp garlic powder
1/2 tsp salt
1/4 tsp pepper
- preheat the oven to 400 F, and place a wire rack over a large, rimmed baking tray; set aside.
- wash the sweet potatoes and cut them into 1/2 inch discs. Place them into a large mixing bowl.
- sprinkle all the other ingredients evenly over the potato discs and using clean hands mix them thoroughly until each disc is completely coated.
- place the discs onto the wire racked baking tray, without overlapping.
- bake for 20-30 minutes, turning halfway through baking time, until browned slightly on the outside and the centres are soft.

Sweet Potato Discs ingredients.

wash and slice the potatoes into 1/2 inch discs.

put the potatoes into a large mixing bowl and sprinkle over the remaining ingredients.

mix everything together so that each disc is covered thoroughly.

place onto a wire rack over a baking tray.

bake until browned on the outside and soft in the middle.

I served them alongside my Southwest 'Philly' Cheesesteak with some chive dotted sour cream for dipping.
Southwest 'Philly' Cheesesteak
Whenever hubby and I go out to a restaurant there are a couple of things that I tend to gravitate to if they're on the menu - along with jalapeno poppers and lemon meringue pie (which doesn't come along too often unfortunately), I love to see Philly Cheesesteak on the page. Some have fancier bread than others, some add a different twist with the cheese choice, some mix up the veggies, but whatever differences are there I'll usually want to try it. Well here's my take on one of my favourites, and I'm calling it my Southwest 'Philly' because like so many of my recipes it's turned down the road to Spiceville with the addition of salsa (you may of noticed our penchant for the salsa kick :o)

Southwest 'Philly' Cheesesteak
serves 4
3 small bell peppers, sliced
1 onion, chopped
3/4 cup salsa
1/2 brick cream cheese
300g deli cooked beef
pinch of salt and pepper
loaf of french bread (or individual baguettes)
4 slices of cheese of choice (I used Havarti)


Southwest 'Philly' Cheesesteak
serves 4
3 small bell peppers, sliced
1 onion, chopped
3/4 cup salsa
1/2 brick cream cheese
300g deli cooked beef
pinch of salt and pepper
loaf of french bread (or individual baguettes)
4 slices of cheese of choice (I used Havarti)
- in a large skillet saute the peppers and onion in a little olive oil over medium to high heat, until softened.
- add the salsa and cream cheese and heat until the cream cheese has melted and the sauce is creamy.
- cut the deli beef up into strips and add to the pan; mix, reduce heat and simmer until the beef is heated through and the sauce has thickened slightly - 5 minutes.
- cut the french loaf into four pieces and slice each piece in half for the sandwich (today I actually used a 'half-baked' baguette that I had in the freezer).
- heap some of the beef mixture onto the bottom of each baguette piece and place a slice of cheese on the top.
- place under a broiler to melt the cheese or if you've been cooking something in the oven (as I was) pop it inside for a couple of minutes just until the cheese is soft and gooey - yum!!

Southwest 'Philly' Cheesesteak ingredients.

in a large skillet saute the peppers and onion.

add the salsa and cream cheese.

reduce the heat and simmer until the cream cheese has melted - sorry about the steam making the photo 'misty' :o)

cut the deli beef into pieces - and of course, nobody will blame you if you sneak a little piece - purely for taste test reasons!!

add the beef to the sauce, mix and heat through.

heap some beef mixture onto the bottoms of the baguette and cover with cheese - this was just before I popped it into the oven to melt the cheese.

we had ours today with some sweet potato discs and chive sour cream.
Thursday, January 20, 2011
Burgers
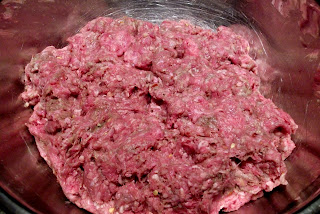
One of our local grocery stores had large 5lb 'sausages' of ground beef on sale the other day, and rather than just dividing it up and popping it in the freezer to be used later for a variety of delicious dishes, I decided today to use half of it to make my mini meatballs and the other half for these burgers. The meatball mix makes delicious burgers too, but I wanted to try something a little different and if I do say so myself these came out great :o)

Burgers
makes 10 x 4oz burgers (1/4 lb)
2 1/2 lb (1.1 kg) ground beef
2 Tbs Ranch style dressing
1 Tbs garlic powder
1 Tbs onion powder
1 Tbs worcestershire sauce
1/2 Tbs red pepper flakes
1 tsp salt
1/2 tsp pepper


Burgers
makes 10 x 4oz burgers (1/4 lb)
2 1/2 lb (1.1 kg) ground beef
2 Tbs Ranch style dressing
1 Tbs garlic powder
1 Tbs onion powder
1 Tbs worcestershire sauce
1/2 Tbs red pepper flakes
1 tsp salt
1/2 tsp pepper
- in a large bowl, using clean hands, mix all the ingredients together until well blended.
- divide the mixture into 10 equal 'balls' of 4oz each - I found it easier to weigh them.
- flatten each ball to make a burger pattie about 1/2 inch thick, and using your fingertips press down in the centre of each pattie to make a dimple - this will prevent the bulge that you sometimes get when you cook fresh burgers.
- grill or fry the burgers over medium-high heat for about 4 minutes per side.
- serve on burger buns with all the trimmings.
- to freeze any uncooked burgers, put them in a large ziploc bag with wax paper between each burger.

Burger ingredients.

mix everything together thoroughly

divide the mixture into 10 (4oz) balls and flatten into burger patties.

any that you aren't going to use immediately, stack with wax paper between, pop into a ziploc bag and freeze.

we had ours on burger buns (that I also made today), with provolone cheese and the usual trimmings, alongside my 'smashed' potatoes.
Wednesday, January 19, 2011
Granola Bars
If you happen to look inside our pantry at any given time you'll usually be able to spot the big box of granola bars on the bottom shelf, just sitting there looking all nutty and fruity. They tend to be our 'on-the-go' snack of choice, finding their way into my hubby's lunchbox every day, the bottom of my handbag for that energy boost, various pockets in our backpack and even just grabbed on the way out the door if we're in a rush. One of the biggest problems though is that they can be a little on the expensive side at times (we try to only buy them when they're discounted at the grocery store). I've been meaning for quite some time to start making my own and I came across this recipe that is chewy and naturally sweet and just plain scrumptious - I adjusted a couple of the ingredients and their quantities to suit me, and I am so pleased with how they came out.

Granola Bars
adapted from this Joyful Abode recipe
makes 18-20 bars
2 cups oats
3/4 cup wheat germ
1/4 cup shelled sunflower seeds **
1/2 cup shelled pumpkin seeds **
3/4 cup plain unsalted peanuts, crushed **
1/4 cup walnuts, chopped **
1/4 cup shredded coconut **
1/2 cup packed brown sugar
2/3 cup honey
1/4 cup butter
2 tsp vanilla extract
1/2 tsp salt
1 cup dried cranberries **
1 cup raisins **
** these were the seeds, nuts and dried fruit that I had on hand and used in ours,but mix and match your own personal favourites, even chocolate chips if you like, just try and keep to the overall quantity so that you have enough 'caramel' to cover everything completely.
- preheat the oven to 400 F.
- line a 9x11 inch baking pan with wax paper, with enough left over the edges to be able to fold back over the top of the mixture; set aside.
- mix the oats, wheat germ, seeds and nuts evenly across a large rimmed baking tray and toast in the oven for 10-12 minutes, stirring every couple of minutes - I already had some toasted coconut left over from a recent recipe so I didn't need to toast mine.
- meanwhile, in a medium saucepan combine the sugar, honey, butter, vanilla extract and salt; bring to a simmer, stirring constantly.
- once the nuts etc are toasted, put them all into a large mixing bowl along with the dried fruit and pour the 'caramel' over everything; mix thoroughly until everything is covered.
- pour the sticky mixture into your prepared baking pan and push to the edges and corners with a wooden spoon.
- fold the edges of the wax paper over to cover the mixture and press down firmly to compact everything - this way they won't crumble when you cut them.
- cool, in the pan, for 2-3 hours.
- once it's completely cooled, carefully turn out onto a large cutting board.
- using a large knife carefully cut the granola into bars or squares (whichever way you want them).
- store in an airtight container separated with wax paper to stop them sticking together - or as I did, wrapped individually in plastic wrap for easy transport in my hubby's lunchbox :o)

Granola Bars ingredients.

prepare a 9x11 inch baking pan with wax paper long enough to fold back over the mixture.

if you're using peanuts, put them into a plastic bag and 'smash' them a little to break them up (I used the bottom of a thick plastic tumbler.)

mix the oats, wheat germ, seeds and nuts on a large baking tray and toast in the oven.

meanwhile, mix the sugar, honey, butter, vanilla extract and salt in a saucepan and bring to a simmer.

put the toasted items and the dried fruit into a large bowl and pour over the 'caramel'.

mix thoroughly until everything is coated.

pour the mixture into your prepared baking pan and spread it out evenly.

fold the excess wax paper over and press down firmly to compress the mixture.

once it has cooled and hardened for about 2-3 hours, turn out onto a large cutting board and using a large knife cut into bars.

I managed to get 18 bars today.

I wrapped my bars in plastic wrap so that we can just grab them and go.
Sunday, January 16, 2011
Applesauce (slow cooker)
We have two large, well established apple trees on our property - a Grimes Golden and a Gravenstein - which, over the years have succeeded in giving us copious amounts of fruit which have gone towards the making of pies and tarts, and cider, and the freshest apple juice that you've ever tasted (the Gravenstein is just pure heavenly nectar that gets squeezed out at a local 'juicing' company called The Cider Press), and of course applesauce - from chunky to go alongside juicy pork chops, and spiced to be used in cakes and cookies, to o'naturel-nothing-added pureed for friends babies.
Unfortunately this isn't the time of year for us to be able to harvest our own crop, but horror of horrors I've completely ran out of our applesauce in the pantry and I just can't bring myself to buy the grocery store brand - I think I've been completely spoilt from being able to make my own now. :o) I usually make it in a saucepan but have decided today to give the slow cooker a try after coming across quite a number of other people that prefer to make it this way. Apart from the usual prep work at either end of the day of chopping and storing it's all the same simple ingredients just a longer cooking time where I can just forget about it - and the house smells....DIVINE!!!!

Applesauce (slow cooker)
makes approx 5 cups
15 small-medium apples (I used a mix of Spartan and Royal Gala today)
1/2 cup packed brown sugar
1/2 cup water (or fresh apple juice)
1 tsp vanilla extract
1/2 tsp cinnamon
juice from 1 lemon
- peel, core and dice the apples and put into a 5-6 quart slow cooker.
- in a small bowl, combine all the other ingredients and pour over the apples: mix well.
- cover and cook on LOW heat for 8-10 hours (or HIGH for 3-4 hours).
- when the apples are soft and tender use either a potato masher or an immersion blender to get your desired consistency.

Applesauce ingredients.

peel the apples - yay, all in one piece!!

I use my handy coring and slicing gadget, but that's just me :o)

dice all the apples and put them into the slow cooker.

mix all the other ingredients in a small bowl (most of the cinnamon will float and won't mix all that well, but that's okay.)

pour the liquid over the diced apples; mix well, cover and cook.
 after 9 hours of cooking on low heat.
 I like to use my applesauce in cookie and cake recipes so I mash it a little to break down the larger pieces.
 sometimes I freeze the applesauce in plastic containers or strong ziploc bags, or as I did today I processed them in jars to store in the pantry.
 before I mashed the applesauce I took out a couple of spoonfuls with the larger chunks to put over some creamy vanilla ice cream - yummy!!!


Waffles
After a bit of a laze in bed this morning (the cats didn't wake us up until 7.30, which is late for them - they must of been out on the town last night with their buddies!! :o), it was time for that first cup of coffee to ease into the day and the decision of what to make for breakfast. As I stood gazing into the cavern of the fridge looking at eggs and bacon and cheese and peppers and tomatoes and....you get the idea....my first thought was along the lines of an omelette or breakfast burrito of some kind, but suddenly I really had a hankering for something a little lighter and sweeter. Waffles!!!
We don't have them very often, not because we don't love them because we do, but with our small kitchen it means that the majority of our kitchen appliances are stored away in a high, deep cupboard above the fridge and the waffle iron tends to find it's way right to the back, so it sort of gets forgotten most of the time. Plus, being someone who is 'vertically challenged' and suffering from severe vertigo I have to rely on hubby to get it for me :o)

Waffles
6-8 servings (depending on how hungry you are :)
2 cups all-purpose flour
1 Tbs sugar
1 Tbs baking powder
1/2 tsp baking soda
1 tsp salt
3 large eggs
1 cup buttermilk **
1/2 cup butter, melted
1 Tbs vanilla extract
** I didn't have any buttermilk, so I made a popular substitute that can be used in place of it in most recipes - put 1 tablespoon of lemon juice or white vinegar into a 1 cup measuring cup or jug and top with milk to make up to the 1 cup mark. Leave to stand for 5 minutes and then use as much as your recipe requires.
- preheat your waffle iron.
- in a medium bowl combine the flour, sugar, baking powder, baking soda and salt.
- add the eggs and buttermilk and using a wooden spoon or wire whisk mix until all the flour has been moistened.
- add the melted butter and vanilla extract and whisk until no more lumps are visible and you have a smooth thick batter.
- spray your waffle iron with non-stick cooking spray, and depending on the size of your appliance, spoon in enough batter to cover the 'hot plate', or for whatever size you want.
- once the waffles are browned to your liking, serve with a variety of goodies; anything from simple honey or maple syrup, to banana and pecans, or maybe fresh strawberries and cream....the skies the limit :o)

Waffle ingredients
(all except the sugar and vanilla extract - they were off whispering in the corner about the other participants - they can be quite rude at times!! :o)

put all the dry ingredients into a medium bowl.

add the eggs and buttermilk and whisk until the dry ingredients have been moistened.

add the melted butter and vanilla (poured in after this shot was taken)

whisk until no lumps remain and you have a nice thick batter.

pour batter onto your sprayed waffle iron - I used about 1/2 to 3/4 cup of batter.

cook to preferred 'doneness'.

today I just went with some wonderful local honey - delicious!
Subscribe to:
Posts (Atom)