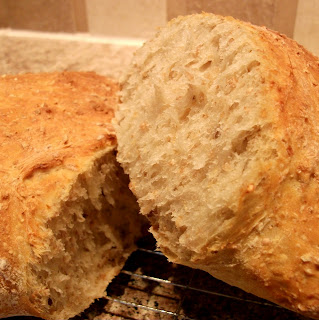
We had family visiting us from the UK and what with getting everything ready for their arrival and out and about with them visiting the island pretty much the whole time they were here, my kitchen didn't get an awful lot of use to be honest - apart from the increase in the amount of granola that we all seemed to consume at breakfast (I think I filled my large jar up about 3 times!!! :o)
I did manage to bake this bread recipe a couple of times that my friend Alana gave me, but each time I kept forgetting to photograph the stages - probably had something to do with not being able to hold the camera in the same hand that I had my glass of wine in ;o)
So this time that I made it, I was determined to have my camera poised and on hand. I've tried a couple of bread recipes in the past and even a no knead one before but this is definitely the best I've made so far. A few simple ingredients, some time and you end up with a delicious 'artisan' bread that you'll make over and over again.
No Knead Bread
makes 2 large or 3 smaller loaves
3 cups warm water (slightly warmer than body temp)
1 Tbs instant yeast
1 Tbs salt
2 Tbs honey (divided)
6 cups bread flour (white, wholewheat, multigrain - one or a mix of a couple, whichever you prefer)
- in a large bowl mix the water, yeast, salt and 1 tablespoon of honey; set aside for 30-60 minutes for the yeast to activate.
- once the mixture has become frothy add another tablespoon of honey, mix, and then add the flour in whatever combination that you desire (the last couple of times I've used 2 cups white / 4 cups multigrain and they've been delicious).
- mix by hand or with a wooden spoon until all the flour is incorporated well; you'll end up with a very sticky dough.
- cover the bowl with plastic wrap and place in a warm spot for 2 hours minimum (my kitchen is usually quite cool so I pop the bowl into the oven with just the light on - no heat - and this is perfect for it to rise).
- after the dough has rested it should be at least doubled, if not more, in size.
- time to get the oven ready; place a baking tray or large cookie sheet into the centre of the oven (this will be used to bake the bread on), and a small high sided cake tray on the bottom (this will be for a cup of water to make steam so that the bread gets a nice crust to it).
- preheat the oven to 450 degrees F, 30 minutes before baking.
- onto an extremely well floured surface carefully transfer the dough from the bowl, and using floured hands or a scraper gently cut and shape the dough into how ever many loaves you are going to make - you don't want to work the dough too much otherwise you'll lose the air in it and end up with a very dense bread.
- carefully transfer the loaves to the hot baking tray (I sometimes use a silicone baking mat that I have to form the loaves on, because then it's easy just to drag the whole thing onto the baking tray without having to disturb the dough too much); place into the oven and pour a cup of water into the lower cake tray.
- bake for 26-30 minutes (depending on your oven) until the bread is golden and it's hollow when you tap the bottom.
- allow to cool completely on a wire rack (if you can wait that long!! :o)
No Knead Bread ingredients.
mix the water, yeast, salt and honey in a large bowl and set aside for 30-60 minutes....
until frothy.
add 1 tablespoon of honey and all of the flour.
either with a wooden spoon or by hand mix....
...and mix well, until...
...all the flour is incorporated and you have a sticky ball of dough.
cover with plastic wrap and leave in a warm place for 2 hours...
...until doubled, at least, in size.
prepare a well floured surface (I sometime use this silicone baking mat, purely for ease of transferring the loaves)
carefully transfer the dough onto the floured surface.
gently cut and shape the dough into how ever many loaves you want to bake - try not to work the dough too much otherwise you'll lose the air.
after you've transferred the loaves to your hot baking tray (sorry - I didn't get a photo of this, didn't want to get burnt while trying to juggle the camera and the hot tray :o), and baked them, let them cool completely on a wire rack.
I like to make the loaves so that they touch each other while baking, then you get a wonderful 'edge' when you just tear them apart - that's always the bakers treat (hopefully while it's still warm) - I have to make sure that they taste okay!!! :o)


No comments:
Post a Comment