Sunday, October 31, 2010

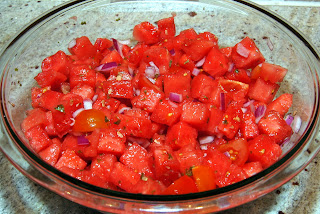
Watermelon Tomato Salad

This is a wonderful summer salad, but even though today is Halloween and the weather is cold and raining, it still works fabulously with the heartwarming butternut squash soup I made earlier.


Watermelon Tomato Salad

1 small seedless watermelon, cubed
12 cherry tomatoes, halved
1 small red onion, chopped
2 tsp parsley, chopped if fresh (I used dried)
1 Tbs lime juice
  • In a large bowl, combine the watermelon, tomato and onion.
  • sprinkle over the parsley and lime juice and toss to coat.
  • refrigerate until ready to serve.

I didn't have any fresh limes, so I used bottled juice - worked great.

these small watermelons are so sweet - delicious.

mmmmm.....watermelon :)

I used red cherry tomatoes, but yellow grape would give a wonderful contrast too.

I didn't have a small onion, so I only used half of a larger one.

this is also a great accompaniment with a salmon fillet.

Butternut Squash Soup

When you start with something as wonderful as a butternut squash it doesn't take many more ingredients to make it into a tasty, heartwarming soup.  This soup comes out quiet peppery (we like it that way), so today I had a watermelon and tomato salad along side to cool things down a bit - a very nice combination.


Butternut Squash Soup
serves 4-6 depending on bowl size :o)

2 Tbs butter
1 small onion, chopped
1 piece (2 inches) fresh ginger, peeled and chopped
2 garlic cloves, chopped
3 lbs butternut squash, peeled, seeds removed and flesh cut into 1 inch cubes
4 cups water
1/3 cup fresh orange juice
1 1/2 tsp salt
1 tsp pepper (or less if you don't like it so peppery)
  • melt the butter in a large saucepan over medium heat.  Cook the onions until slightly transparent, about 2 minutes.
  • add the ginger, garlic and squash; cook, stirring occasionally, until fragrant, about 6-8 minutes.
  • pour in the water and bring to a boil; reduce heat and simmer until the squash is tender, about 20 minutes, stirring occasionally.
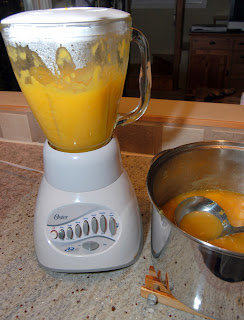
  • puree the soup in a blender in batches (when pureeing hot liquids you should only fill your blender to half way).
  • stir in the orange juice, salt and pepper and serve hot.

 unfortunately I didn't grow butternut squash this year, but next year I will and it will taste even better!!!

don't throw those seeds away. Toss them with a little salt, chili and cayenne pepper and roast in the oven at 350 F, for about 10-15 minutes. Delicious.

little golden nuggets

onion, ginger and garlic - three intense flavours that compliment the squash perfectly.

I LOVE the smell of onions as they cook.

doesn't look much like soup yet, but it will.

as the water boils and then simmers, stir occasionally.

if you don't have a stand blender, an immersion blender will work just as well.

we had ours with a cooling watermelon and tomato salad on the side.

Halloween 'Skeleton' Sugar Cookies

Happy Halloween!!

What better opportunity to practice my piping skills (which are very rarely used), than making little one-bite cocoa 'skeleton' sugar cookies.  I wanted to make cocoa cookies so that the white 'bone' icing would show up better and originally I had the thought of making bigger 'people', but unfortunately when I searched through my cookie cutter collection the only one I could find was a small 1.5 inch size in a tin with other miniature Christmas cutters.  It works out really well though, because this way they're just the right size for little kids - okay, and big kids too!!


Cocoa Sugar Cookies
quantity depends entirely on size of cutter - I got around 120 cookies from a 1.5 inch cutter

2 3/4 cups flour
3/4 cup cocoa powder
1/2 tsp salt
1 tsp baking powder
1 cup butter (room temp)
1 3/4 cup granulated sugar
2 large eggs
2 tsp vanilla extract
  • in a medium bowl, mix the flour, cocoa powder, salt and baking powder.
  • in a stand mixer, beat the butter and sugar for about 3-4 minutes.
  • add the eggs, one at a time, to the butter mixture.  Add the vanilla and combine well.
  • add the flour mixture and blend until a smooth dough.
  • divide the dough in half, wrap in plastic and refrigerate for at least an hour.
  • when you're ready to bake the cookies, preheat the oven to 325 F, and position rack in the middle of the oven.
  • line 2 cookie trays with parchment paper.
  • roll half of the dough to 1/4 inch thickness on a floured surface, rotating the dough often to stop it from sticking.
  • cut out desired shapes, and transfer to the cookie trays.  The scraps of dough can be re-rolled a second time to make more cookies.
  • put the cookie trays into the refrigerator for 10-15 minutes to firm up slightly. This will stop the cookies from spreading while they bake.
  • bake for 10-12 minutes (depending on size). Cool on trays for a couple of minutes, and transfer to cooling racks.
  • repeat with the second half of the dough.
  • once cookies are completely cooled, pipe desire design onto each.


Icing for piping
this will give you around 1 1/5 cups of icing

1 large egg white
1 tsp lemon juice
2 cups icing sugar
  • beat together the egg white and lemon juice just until beginning to froth.
  • add the icing sugar and mix to a stiff, peaked consistency.
  • either use a small piping bag and nozzle if you have one, or just as good is a small zip-loc bag with a small hole cut from one corner (make sure you don't cut the whole too big though :).
  • pipe away!!!

 here come the cookies!!

you can sift the dry ingredients if you want, but I didn't and they came out fine.

flatten the dough into discs and they'll be easier to roll when they firm up.

 the dough can be quite fragile so work gently with it.

ready to be baked.

they kept their shape really well because of the firming up in the fridge beforehand.

let them cool completely before you pipe the icing.

mix the icing ingredients until stiff and shiny.

they were so tiny that I couldn't get too elaborate with the design.

Boo!!!

Saturday, October 30, 2010

One Pan Roast Chicken and Vegetables

Yay, we finally have a stocked fridge and pantry again - and it only took us three weeks to get to the grocery store!!

Of course, after that heinous expedition (believe it or not, I don't particularly like grocery shopping :), the last thing I wanted to do was cook some elaborate dinner even if we did have some awesome ingredients to choose from.  So out came the deep dish roasting pan for a simple chicken and vegetable roast.  It all goes in together, gets roasted to perfection and tastes divine.


Roast Chicken and Vegetables
2 servings

2 chicken portions (whatever you prefer works, we had a couple of full leg portions)
2 medium russet potatoes
1-2 carrots (depending on size)
1 red onion
1 red pepper
4 garlic cloves
1 Tsp olive oil
1/2 tsp chicken seasoning
pinch salt & pepper
  • preheat oven to 425 F.
  • cut the potatoes, carrots, onion and pepper into 1 inch size pieces.
  • chop one of the garlic cloves into slices but leave the other three whole (in their skins is okay).
  • place the chicken into a large deep roasting pan surrounded by all the vegetables.  Pour the olive oil over everything and stir until everything is coated evenly.
  • sprinkle salt and pepper over everything, and the chicken seasoning over the chicken.
  • bake for 45 minutes, turning the vegetables halfway through cooking.
  • serve with a little gravy if desired.

    simple ingredients = good food

    cut all the vegetables to uniform bite size pieces.

    don't crowd the pan too much, otherwise the vegetables won't get crispy.

    looks delicious!!

    a little homestyle gravy finished it quite nicely :o)

    Wednesday, October 27, 2010

    Slow Cooker BBQ Chicken with Sweet Potato Fries and Balsamic Peas

    One of my favourite pieces of equipment in the kitchen is undoubtedly my slow cooker.  I love it so much in fact that I have two of them!!  Who doesn't want to have only a little prep work and then....voila....hours later a main course and either a side or even a dessert all ready to go.  I even have an insulated carry bag (it came free when we purchased the second slow cooker), and there's nothing quite like taking something hot, that stays hot, to a pot luck or even a picnic - I took a creamy potato and ham bake on a picnic back in the summer and a friend of ours said that it was the first picnic he'd ever been on with hot food :o)

    Having said that, today I only used one of the cookers but hey, I have to make it look as if I'm working hard in the kitchen don't I? :o)


    Slow Cooker BBQ Chicken
    4 servings

    4 chicken breasts (boneless & skinless), cut in half
    1 bottle favourite BBQ sauce (I used a hickory smoked one today)
    1/4 cup white vinegar
    1/2 cup brown sugar
    1 tsp mesquite seasoning
    1 tsp garlic powder
    • in a bowl, mix all ingredients except the chicken breasts.
    • place the chicken breasts in the slow cooker and pour the BBQ mixture over all to cover.
    • cook on low temp for 5-6 hours.

    Sweet Potato Fries
    4 servings

    3-4 red skinned sweet potatoes (depending on size)
    2 Tbs garlic olive oil
    2 tsp chili powder
    1 tsp paprika
    1 tsp salt
    • preheat oven to 425 F.
    • wash the potatoes and pat dry.  Leaving the skins on, cut into chunky 'sticks', place into a large bowl and toss with the oil.
    • sprinkle the chili powder, paprika and salt over the oiled fries and toss until evenly distributed.
    • arrange fries in a single layer onto one or two baking trays covered with parchment paper or foil sprayed with cooking spray, and bake for 25-30 mins, turning half way through cooking, until fries are browned and crispy.

    Balsamic Peas
    4 servings

    10 oz  frozen peas
    1/4 cup mayonnaise
    1 Tbs balsamic vinegar
    a good pinch of salt and black pepper
    • place the frozen peas in a colander and run under warm water until thawed.  Place into a bowl.
    • add the mayo, balsamic vinegar, salt and pepper and stir until combined.
    • cover and refrigerate until needed.

     I used an extra chicken breast today because the ones I had were pretty puny.

    make sure each chicken piece is coated with sauce.

    I like to keep the skins on for that home-style feels, but you can peel them first if you prefer.

    even before they're baked they look yummy :o)

    you can add practically anything else to this dish that you might have on hand - green onions, red peppers, feta cheese...

    green jewels.

    a little dollop of sour cream for the fries is all that's missing.

    Tuesday, October 26, 2010

    Chicken Salsa Quesadillas

    I've spent most of today on the computer sorting out one project or another that I've been meaning to get to for some time now, and time has completely flown away from me.  Hence the quick and easy - but still delicious - dinner of chicken quesadillas.  I have to admit I just love meals like this - 5 or 6 ingredients that I've usually got on hand, and before you know it, happy full bellies, empty plates and left overs (if we're lucky) for lunch tomorrow.  Can things be any simpler?


    Chicken Salsa Quesadillas
    Yields 4-6 servings

    1/2 cup salsa
    2 Tbs mayonnaise
    1/2 tsp chili powder
    2-3 cooked chicken breasts, chopped (divided)
    1 cup grated cheese (divided)
    4 large tortillas
    • mix together the salsa, mayo and chili powder, and spread on each tortilla.
    • layer chopped chicken and cheese evenly onto half of each tortilla.
    • fold tortillas in half to enclose filling.
    • heat a large skillet on medium, sprayed with cooking spray.  Add quesadillas, 2 at a time and cook for 4-5 minutes, carefully turn over and cook another 4-5 minutes until lightly browned.
    • cut each quesadilla into 3 wedges and serve with sour cream and additional salsa.

       three simple ingredients that combined taste awesome.

      this mix would work great with burgers or paninis too.

      I used medium cheddar - the stronger flavour means you won't use as much :o)

      shred or chop the chicken, whichever works for you.

      lots of cheesey, chickeney goodness!!!

      I find it easier to assemble all the quesadillas before cooking them.

      pick up, dunk in salsa & sour cream and eat - how simple!!!